Introduction: Why Lighting Is the Backbone of Video Production
When it comes to video shoots—whether it’s for commercials, interviews, product demos, or content creation—lighting can make or break your final output. The right lighting brings clarity, depth, and emotion to your visuals. Poor lighting, on the other hand, results in flat imagery, harsh shadows, or distracting color shifts that even post-production can’t fix.
In this article, we’ll walk through the essentials of lighting for video shoots, covering fixture types, color temperatures, light positioning, and how to build a flexible setup for any scene.
1. Understand the Purpose of Lighting in Video
Lighting serves both technical and artistic functions in video:
Technical: Ensures the camera captures sharp, well-exposed footage with accurate color.
Artistic: Guides audience focus, sets the tone, and enhances mood.
In video production, lighting is about control and consistency. Unlike live shows, the goal isn’t to dazzle, but to sculpt and direct visual attention with precision.
2. Choose the Right Fixture Types
Not all stage lights are suitable for video. Here are the most commonly used types for high-quality shoots:
a) Soft Lights (Key and Fill)
Used for key lighting subjects without harsh shadows.
Ideal fixtures include LED panels, softboxes, or COB-based flood lights with diffusers.
b) Hard Lights
c) Profile Spotlights
3. Master Color Temperature and White Balance
Lighting for video must match the camera’s white balance settings to ensure natural skin tones and consistent ambiance.
Common Temperatures:
3200K (Tungsten): Warm indoor lighting
5600K (Daylight): Neutral white, suitable for most scenes
Bi-color or RGB: For flexible creative control
Use lighting fixtures with adjustable CCT (Correlated Color Temperature) and high CRI (Color Rendering Index)—preferably 90+—to ensure true-to-life tones.
4. Apply the Three-Point Lighting Technique
The three-point setup remains the foundation of most video shoots:
Key Light: The main source of illumination.
Fill Light: Softens shadows cast by the key.
Back Light (or Hair Light): Adds depth and separates subject from the background.
By balancing these three elements, you can achieve a cinematic look that works for both static interviews and dynamic motion shots.

5. Avoid Flickering and Strobing
Stage lighting often uses PWM (pulse-width modulation) dimming, which can cause flicker when captured on camera—especially at higher frame rates.
Tips:
Choose flicker-free certified LED fixtures for video.
Test each fixture under your intended frame rate and shutter speed.
Avoid high-speed dimming or strobe settings unless intentionally used for effect.
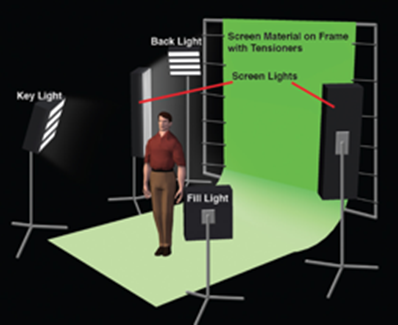
6. Consider Lighting for Green Screen and Product Shoots
For chroma key (green screen) shooting:
Use even, shadow-free lighting across the screen.
Backlight the subject separately to avoid green spill.
For product videos:
7. Portable and Modular Options for On-Location Shoots
When shooting outside the studio, portability is key. Look for:
Battery-powered LED lights
Lightweight tripods and clamps
Weatherproof options like IP65-rated LED Par Lights for outdoor content shoots
Compact and wireless systems help reduce setup time and increase creative freedom.
READ MORE:


