Introduction: Why Fixture Balance Matters
In the world of stage lighting, safety and precision are paramount. Whether you're preparing for a live concert, corporate event, or theatrical production, properly rigging lighting fixtures is a critical step. Among the most overlooked yet essential tasks is checking fixture balance before lifting to rig.
An unbalanced lighting fixture doesn't just pose a safety hazard; it can compromise alignment, stress mounting hardware, create uneven distribution of light, and—if left unchecked—risk structural damage or complete failure during a show.
In this article, we’ll explore the reasons fixture balance matters, how to perform effective checks, the tools involved, and best practices for different fixture types and rigging environments.
Understanding Balance in Lighting Fixtures
Fixture balance refers to the even distribution of weight around a fixture’s central mounting axis. Ideally, when lifted, the fixture should maintain a neutral tilt or remain steady on its designated yoke or bracket. If the fixture tips forward, backward, or twists on its mount, it’s considered off-balance.
Balance is especially crucial for:
Moving heads, which often include multiple internal motors and lenses
Large-format projectors or LED panels
Blinder arrays or LED matrix bars
Profile or framing lights with extended accessories
Even small shifts in center of gravity can affect stability once the fixture is hoisted several meters above the stage.
Risks of Ignoring Fixture Balance
Failing to verify balance can lead to:
Premature fixture sag on truss or pipes
Damage to clamps and mounts
Fixture rotation or movement after installation
Mismatched pan/tilt behavior in moving lights
Increased vibration during live performance (especially with low-frequency audio)
Worst-case scenarios involve dropped units or structural stress on the rig itself, potentially endangering crew and performers.
When Should You Check Balance?
Balance should be checked during:
Pre-show prep in the tech warehouse
Fixture maintenance or repair
Fixture modification, e.g., adding barn doors, filters, gobos, or wireless DMX receivers
Rental turnaround, especially after gear has traveled
On-site rigging prior to lift, when mounting orientation changes
It is not sufficient to trust the factory balance if accessories, mounting hardware, or even lamp positioning have been altered.
Tools for Fixture Balance Checks
You don’t need an engineering lab to perform effective balance assessments. Here are simple but effective tools:
C-stand or adjustable T-bar for temporary mounting
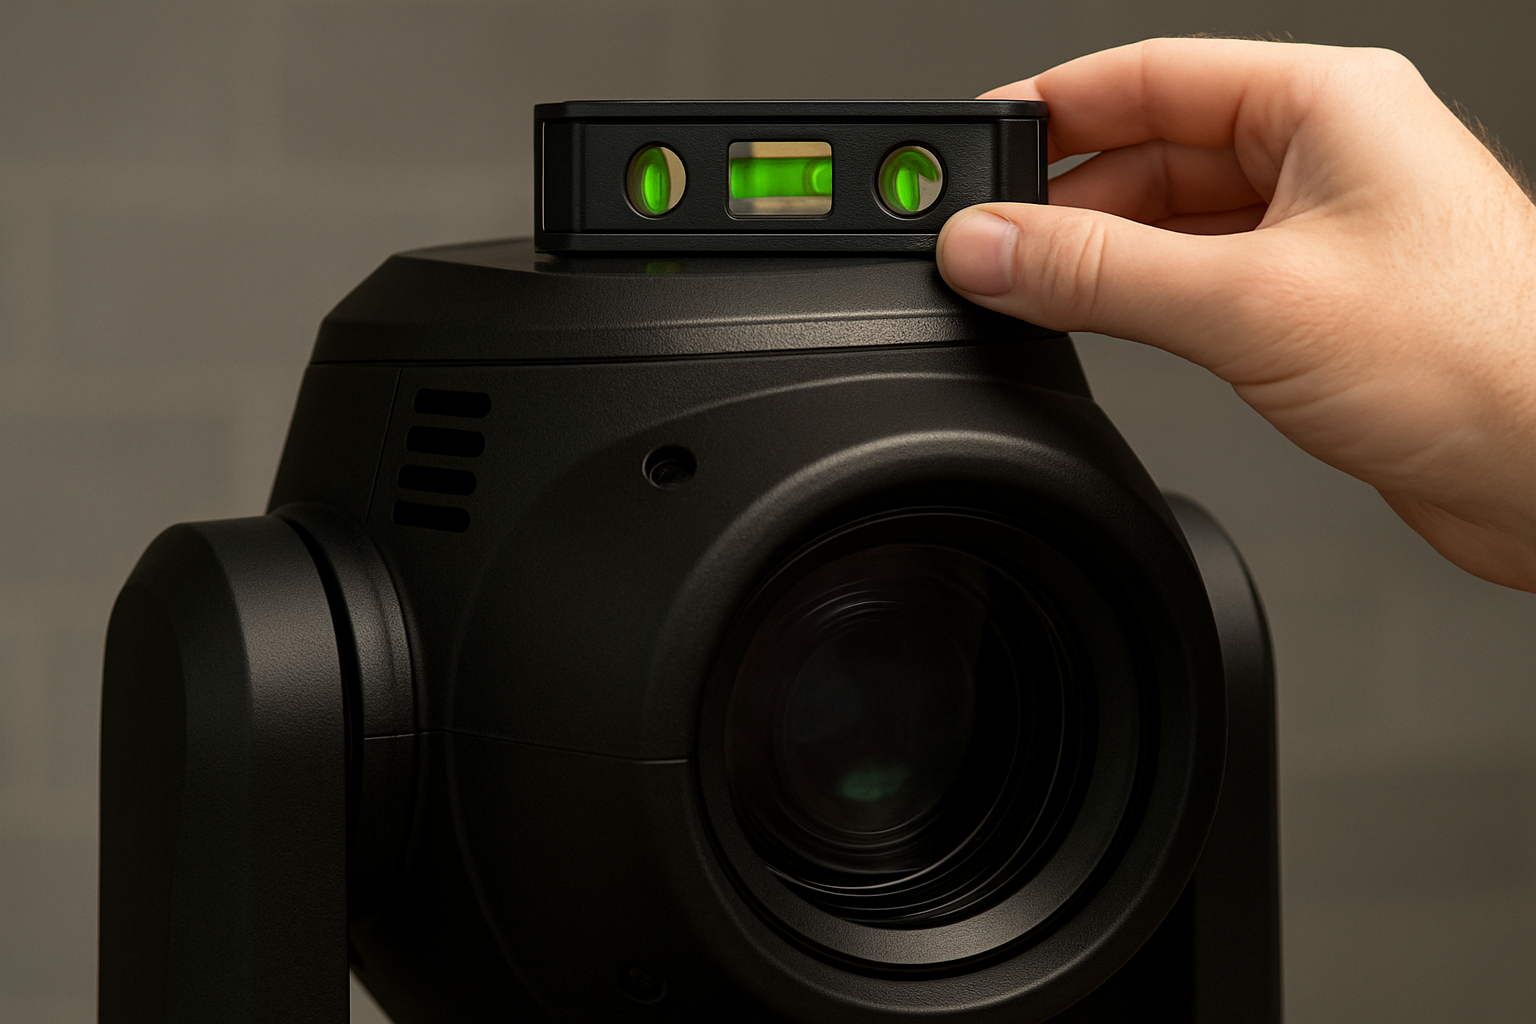
Spirit level or bubble level
Pivot clamps or swivel base mounts
Digital angle finder for precision balance
Counterweight kits for test adjustment
Wrenches and locking washers for secure repositioning
Optional but helpful:
Load cell hooks or torque sensors to assess load symmetry
Gaffer’s tape for marking center of mass after calibration
Step-by-Step: How to Check Fixture Balance
1. Mount on a Temporary Stand
Attach the fixture to a C-stand or a short rigging arm with a central pivot. The goal is to simulate a suspended lift where you can freely observe its natural hang.
2. Observe Tilt and Rotation
Let the fixture settle naturally. If it tilts noticeably in one direction, it indicates an uneven center of gravity. Gently rock it to assess stability and see if it returns to a neutral axis.
3. Use a Spirit Level
Place a small bubble level on the top edge of the fixture’s housing or yoke. If the bubble shifts to one side, note which axis is off. Repeat this for both vertical and horizontal axes.
4. Check Accessories
Remove any barn doors, diffusion lenses, DMX adapters, or antenna modules, and test again. These seemingly minor additions can shift balance, especially on lightweight units.
5. Add Temporary Counterweight (if needed)
If the fixture is consistently off-balance, try adding small counterweights with Velcro or clamp mounts. Re-test until a stable center of gravity is achieved.
6. Mark the Mounting Point
Once you’ve confirmed balance, mark the center point on the yoke or mounting bracket. Use gaffer tape, marker, or engrave if necessary. This ensures you or other team members know the correct mounting position later.
Fixture-Specific Considerations
Moving Head Lights
Due to internal motors, moving heads often have top-heavy designs. Ensure the yoke position is level with fixture weight and that pan-tilt motors aren’t under stress at idle position. Test pan/tilt response after balance correction.
LED Panels and Blinder Bars
These tend to be front-heavy, especially if lenses or diffusion covers are installed. If using an Omega bracket or dual clamp setup, ensure equal distribution across both sides.
Framing Spotlights
Many framing fixtures use shutters or rotating blades. When shutters are pulled far in, the added metal weight can shift internal balance. Always recheck after programming framing presets.
Lifting Best Practices After Balance Confirmation
Double-Check Clamps: Ensure all clamps are torqued to spec and safety bonds are attached
Lift Slowly and Steadily: Use winches or chain hoists with even tension
Pause Mid-Lift: Stop halfway to observe any swinging or rotation
Final Adjustments in the Air: Use pan-tilt locks and fine clamp repositioning to correct minor deviations
Avoid making balance adjustments while suspended unless you're on a secure platform or lift.
Real-World Examples
Concert Tour Prep:
A technician added wireless receivers to 40 profile lights. During tech rehearsal, half the fixtures began to tilt downward. Post-analysis revealed the extra hardware shifted the balance point. By relocating the receiver closer to the fixture base, they restored stability.
Theater Rig Refocus:
A venue noticed that their backlight beams drifted off-target after several weeks. Inspection showed small yoke tension failures combined with off-center rigging caused balance creep. Repositioning fixtures and replacing worn yokes solved the problem.
Long-Term Benefits of Balance Checks
Reduced mechanical strain on clamps, yokes, and mounts
Consistent light position and alignment show after show
Less mid-show adjustment or fixture drift
Improved safety record during touring and fast turnovers
Professionalism in load-in/load-out operations
Conclusion: A Small Step With Big Impact
While it may take only a few minutes, checking fixture balance before lifting to rig can prevent hours of troubleshooting, equipment damage, and serious accidents. It reflects a mindset of safety, professionalism, and care that every lighting crew should embrace.
In high-pressure environments—where equipment is hoisted, focused, and operated under tight deadlines—nothing beats a well-balanced rig. Make fixture balance a standard part of your pre-rig checklist, and your lights will thank you with steady, reliable performance.
READ MORE:


Blue Sea Lighting is an enterprise with rich experience in the integration of industry and trade in stage lighting and stage special effects related equipment. Its products include moving head lights, par lights, wall washer lights, logo gobo projector lights, power distributor, stage effects such as electronic fireworks machines, snow machines, smoke bubble machines, and related accessories such as light clamps.
Quick Links
For more questions subscribe to our email